

Validation and AJAX with jQuery
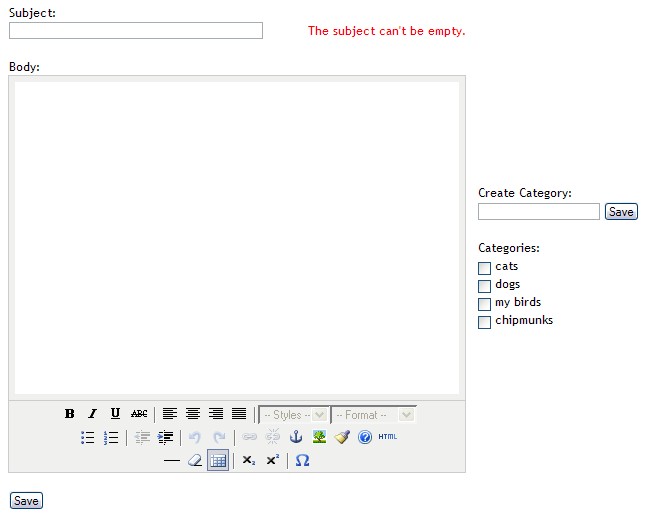
In this article I will describe setting up an interface for writing articles that is reminiscent of WordPress but much simpler. We will use jQuery and a suitable plugin to do client side validation, we will also implement some jQuery AJAX to make the form more responsive.
The markup is rendered with Smarty:
{config_load file="$config_file"}
<SCRIPT type="text/javascript" src="{$baseUrl}/tinymce/jscripts/tiny_mce/tiny_mce.js"></SCRIPT>
<SCRIPT type="text/javascript" src="{$baseUrl}/js/jquery.js"></SCRIPT>
<SCRIPT type="text/javascript" src="{$baseUrl}/js/stringaide.js"></SCRIPT>
<SCRIPT type="text/javascript" src="{$baseUrl}/js/validationaide.js"></SCRIPT>

<script language="javascript" type="text/javascript">
// <![CDATA[
<!--Javascript section here-->
// ]]>
</script>

<form id="save_article_form" action="{$baseUrl}/index/d/c/blog/f/saveArticle" method="post">
<table>
	<tr>
		<td>
			<label>{#article_headline#}:
				<br/>
				<input type="text" style="width:250px;" class="validator-required" id="headline" name="headline" title="{#article_headline#} - {#headline_err#}">
			</label>
			<br/>
			<br/>
			{#article_body#}:
			<br/>
			<textarea name="article" cols="70" rows="30">{$article_content}</textarea>
			<br/>
			<input type="submit" value="{#save#}"/>
		</td>
		<td>
			{#create_category#}:
			<br/>
			<input type="text" id="category_headline" name="category_headline">
			<input type="button" id="post_cat_btn" value="{#save#}">
			<br/>
			<br/>
			{#categories#}:
			<br/>
			<div id="categories">
				{include file="blog_categories.tpl"}
			</div>
		</td>
	</tr>
</table>
</form>
And the Javascript section:
var saveCatUrl = "{$complUrl}/blog/saveCategory/";
{literal}

$(document).ready(function(){
	$("#post_cat_btn").click( postNewCategory );
	$(":checkbox").click( updateSelCategories );
	$("#save_article_form").validationAideEnable(null, {showInlineMessages:true, showSummary:false});
});

function updateSelCategories(){
	$cat_sels = $("#category_selections").val('');
	var cat_boxes = $(".sel_category");
	jQuery.each(cat_boxes, function (){
		if(this.checked == true){
			var split_id = this.id.split('-');
			var sel_id = split_id[1];
			var old_val = $cat_sels.val();
			$cat_sels.val(old_val + sel_id + " ");
		}
	});
	//alert($cat_sels.val());
}

function postNewCategory(){
	var category_headline = $("#category_headline").val();
	$.post(saveCatUrl, {headline: category_headline}, function(new_category){
		var cats = $("#categories").html();
		$("#categories").html(cats + new_category);
	});
}

tinyMCE.init({
	mode : "textareas"
});

{/literal}
Ignore the {literal}{/literal} Smarty tags, they are only needed to mark sections that should be taken literally, otherwise { and } would interfere with the markup rendering.
blog_categories.tpl:
<input type="hidden" id="category_selections" name="category_selections" value="">
{foreach from=$categories item=category}
	{include file="blog_category.tpl"}
{/foreach}
And blog_category.tpl:
<input type="checkbox" id="category-{$category.id}" class="sel_category">
{$category.headline}<br/>
So what is happening here? Let’s begin with the includes, I use ValidationAide. First I tried with jQuery YAV but it stubbornly refused to work for me so I ended up testing validation aide instead which basically is the same thing but it actually works.
Validation is now ridiculously simple by first initializing in the jQuery ready() function and then using class=”validator-required” in a field that is required for instance. The error message is contained within the title attribute.
To make it look good with the error message to the right I also had to create the following CSS:
div.validation-inline-error-message {
	color:#FF0000;
	display:block;
	float:right;
	padding-left:10px;
}

label input {
	display:block;
	float:left;
}
It will style the automatically created div that contains the error message. Also take note of the fact that I use showSummary:false to turn off a big block that would otherwise had summed up all the errors in all fields at the top of the form.
Let’s move on to the AJAX which is used to create new categories on the fly and display these new categories. If you want to know how the PHP back end works you have to check out writing a CMS/community with Smarty and ZF part 7. When the “post_cat_btn” button is pressed we will call the PHP which creates the new category for us and returns it to our interface. The new category will be appended to our checkbox list for immediate use.
Lastly, each time the user checks a category updateSelCategories() will be called which updates a hidden field with the selected categories’ ids separated by a space. This list will later be used by PHP to link each selected category to the submitted article.
Related Posts
Tags: ajax, Javascript, jquery, Smarty, validationaide